Kenosha Reuse Discussion Board > KENOSHA, WI
> Commercial
> Industrial
> Used
> No Warranty
> New hl-wdâ…±dental spot welder - brand
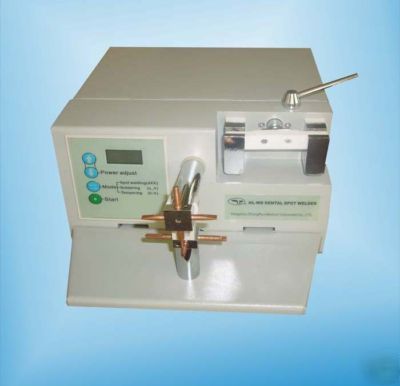
New hl-wdâ…±dental spot welder - brand
HL-WD Spot welder is a kind of mechanical that used for the dentistry to remedy and repair the welding of stainless steel wire. It can also be used to heat and former the orthodontic materials. The object of the weld and heat is stainless steel wire of the thickness 0.2-1.8mm.
This is AC voltage regulate welder, spot-weld belongs to the resistance welding, since clips the two weldment tightly between the top and bottom electrode, because, in the whole circuit, the resistance of contact weldment is the largest, when power turn-on, the voltage is on the contact weldment and make a large heat to heat the metal quickly. At this time, under the machine pressure, weldment was weld together.
This machine adopt AC voltage regulator, it has complete and precise power control, and it can be used to spot welding, braze welding, heat treatment.
The feature of AC voltage regulate spot welder is adjust primary welding transformer, use microprocessor to control flow angle of controlled silicon, then control the output pulse and pulse times to satisfy the demand of welding.
The top electrode arm have four electrodes, can be rotated to choose the suitable electrode, the bottom electrode arm also have four electrodes, it can be rotated to choose the suitable electrode, so that make up of different sets of electrode suit, to adapt various different welding. Furthermore, the electrode revolves 90 can position automatically at each time
1.1 Choose suitable electrode group according to the weldment demand, check the electrode, if it was oxidized, and the point of weld should be polished smoothly with sandpaper and polishing file firstly.
1.2 The weldment needs to cleanliness, no oxidization, without greasy dirt etc.
1.3 Connect the power supply, turn on the power switch, press the mode switch key-press (No. 11) to set up the welding mode views dXX (X means numeral value, same as follows) and according to the size of the welding material, choose suitable welding power (find attachment test parameters), use button (No.1) increase the power, use button (No.12) decrease the power.
1.4 Press to the welding pressure pad (No. 7), put the demand weldment to the top and bottom electrode, then relax the welding pressure pad slowly, make sure the top and bottom electrode compressed the weldment tightly. Press Start button (No.10) or feet step switch (No. 9) after confirm the right welding point. Then it will put out energy between the top and bottom electrode to welding. After finished output, relax the electrode arms, dismantle the weldment, and then carry on next welding.
2.1 Firstly put mode plate (attachment is a piece of Plastic Bracket that hangs on between top and bottom electrode arms) between top and bottom electrode arms, opening top and bottom electrode arms, then set the machine on heat treatment state through the mode set button, views h-X.
2.2 According to the diameter and length of arch, and heat treatment pole, set up suitable heat power, use , to adjust.
2.3 Press the pressure plate, apart the two electrodes with plastic bracket. (If not apart the electrode, when Start, it will view Err , beep alarm).
2.4 Operation heated holder clip the arch between heat treatment poles, press start button or step upon foot switch, then the back-fire poles will output energy to advance heat operation, releases start button (or feet step switch) to stop heating. After heated, relax the holder, life down the arch then carry on next heat.
3.1 Choose suitable electrode group according to weldment demand, check the electrode, if it was oxidized, and the point of weld should be polished smoothly with sandpaper and polishing file firstly.
3.2 The weldment needs to cleanliness, no oxidization, without greasy dirt etc.
3.2 The piece of welder needs to cleanliness, no oxidization, without greasy dirt etc.
3.3 Connect the power supply, turn on the power switch, through the mode switch key-press button to set up braze welding, shows q_X, and according to the specifications of the welding material, choose the suitable power of braze welding.
3.4 Press to the welding pressure pad, wipe welding paste between the two welding material, put two welding materials into the top and bottom electrode, make sure the two welding material was compressed tightly, then relax the welding pressure pad slowly. Press the start button or feet step switch after confirmed the right position of the welding point. Then it will put out energy between the top and bottom electrode to welding. Complete braze welding after release start button (or feet step switch). Relax electrode arms when finish welding, dismantle the welding material, and then carry on the next welding.
4. Control panel button operation:
a) In stand-by state, short time press top right button ( ): Power display screen shows value increase 1,the value will jump to lower limit when increased to upper limit automotive.
b) In stand-by state, short time press right middle button( ): Power display screen shows value decrease 1, the value will jump to upper limit when decrease to lower limit automotive.
c) In stand-by state, short time press (MODE) button: the value of bulletin of decision digital tube changed once, it will circulate with dXX, q_X, h_X three types. The meaning indicates: spot welding, braze welding, backfire welding, press this button a long time, only respond one time (X shows input value, same as follows).
d) Stand-by state, digital indicate dXX means spot welding mode, no status block between electrodes, press (START) button to carry on welding, press this button a long time, and only respond one time.
e) Stand-by state, digital show h_X means heat treatment, put status block between electrodes, press (START) button to carry on heat, relax the button will stop heating immediately.
f) Stand-by state, digital show q_X means braze welding mode, no status block between electrodes, press (START) button to carry on braze welding, relax the button will stop braze welding immediately.
g) Stand-by state, ensure current function mode same as the system mode totally when press (START). Or the buzzer couldn t work, it will shows Err, press this button a long time, it only respond one time.
h) Press each above button, buzzer will respond.
i) If buzzer responds endless, seems it didn t work at present.
8. When the machine breaks down, contact the factory or be fix by the professional personnel in time
VI The enclosure general chart( packing list)
1) Power cable 1 pc 2) Foot step switch 1 pc
3) Fuse 5 A 2 pc 4) Status black 1 pc
Please read the rules carefully in the repair card, and returns back the receipt to us, its benefit for product maintains. One-year guarantee.